Bally Alley
Programming the Bally Arcade/Astrocade
(April 12, 2016)
contains a Z80 source file
This article explains how to set up the PS Pad text editor so that it will automatically assemble the source code of a program that runs on the Zilog Z80 CPU. We'll be using the Zmac z80 cross-assembler, which is a command line-only program.
More specifically, you'll be guided through the process required to make Zmac the default editor for assembling Bally Arcade/Astrocade programs. Once these step-by-step directions are completed, PS Pad will be more than just a text editor; it will become a nearly complete Integrated Development Environment (IDE).
Note that ZMac 1.3 and PSPad 4.5.6 were used when this document was written. The following instructions presume that you'll be running the programs on a computer with Windows. The set-up process that the instructions describe has been tested in Windows 7, but it will be similar in other versions of Windows. The instructions are not directly applicable to Linux computers or the Macintosh, but since ZMac is a free, cross-platform cross-assembler, the following steps can be used as a rough guide to using ZMac on non-Windows systems.
Table of Contents
- Introduction
- Astrocade Programming Using the "Nutting Manual"
- Download the Zmac Assembler
- Download PS Pad and z80.ini
- Download the "Home Video-Game Library" Equates (HVGLIB.H)
- Set Up PS Pad for Use with the Zmac Assembler
- Test PS Pad by Assembling Z80 Source Code
- Summary
- Version History
I. Introduction
I program for several different classic microprocessors that use different assemblers. Every assembler that I use is accessed via the command line. While this isn't a hurdle, I do prefer a GUI interface. I am able to use PS Pad, a freely distributable text editor for Windows, as a front end for all of my assembly work on various processors.
In most cases, programmers use the file extension .asm for assembly source-code files. This won't work in my case, because I use different assemblers for different CPUs. PS Pad determines which assembler to use for various types of source code, based on each file's extension. Thus, in my case, an .asm file is assembled as 6800 CPU source code, and an .F8 file is assembled as Fairchild CPU source code. I decided to make .Z80 the designated source-code extension for PS Pad when it assembles Zilog Z80 CPU files. The .Z80 file extension is commonly used with ZX Spectrum computer emulators for memory snapshots. This doesn't matter to PS Pad, as the file extension is always arbitrary. Consistency is all that's required. In this case, as long as you follow these instructions, then your source code with the file extension .Z80 will be assembled correctly.
II. Astrocade Programming Using the "Nutting Manual"
Software and Hardware for the Bally Arcade - A Technical Description (unofficially, but commonly, called the "Nutting Manual") - Describes the Bally Home Video-Game System. The description begins with a discussion of the major sub-sections of the system. Following this, each sub-section is presented in greater detail. The particulars include sequence-calling and resource use.
The major sub-sections of the system are:
- The User Program Interface - Allows cartridges to reference the system routines through a standard interface. Includes an interpreter.
- The Screen Handler - A complex set of routines for creating screen images. Includes facilities for initialization, pattern and character display, coordinate conversion, and object vectoring.
- The Interrupt Processor - Decrements timers, plays music and produces sounds.
- The Human Interface - Reads keyboard and control handles, and inputs game selection and options.
- Math Routines - A package of routines for manipulating floating BCD numbers.
Also included in the "Nutting manual" are the complete source-code listings for the console's four built-in programs (Calculator, Checkmate, Gunfight and Scribbling).
- The "Nutting manual" is available in various formats here:
"Nutting Manual" - Software and Hardware for the Bally Arcade - A Technical Description
This manual will be the primary resource for learning the ins and outs of the Bally Arcade/Astrocade.
III. Download the ZMac Assembler
be used from the command line
Zmac is a command-line assembler that supports the Zilog Z80 CPU. It works perfectly well without a front end, but when used in conjuction with one (such as PS Pad), the pairing of the two makes for a near-complete IDE. For more thorough instructions on the use of Zmac, be sure to read the assembler's instructions.
These steps prepare Zmac for use with PS Pad:
-
Download and unzip the Zmac assembler. The version used for this tutorial is 1.3. It is available as a local file here:
Zmac13_win32.zip (Zmac 1.3, Local Version)
A later, updated version of ZMac (currently Dec. 3, 2014) can be found on George Phillips's website, Zmac Main Website. I have not used this updated version of the ZMac assembler. I recommend only trying the updated version once you've confirmed that Zmac 1.3 works once you've followed these instructions.
- After unzipping Zmac13_win32.zip, I have placed zmac.exe (located in the "zmac_win32" directory of the Zmac archive) into a newly created directory called "H:\zmac." I use the H: drive on my computer. If this doesn't apply to you, use another drive, such as, if possible, the D: drive. Zmac will work from any location, but placing it into its own directory will make following the set-up of PS Pad a bit easier for you.
At this point, Zmac can be used as a command-line assembler. No additional files other than zmac.exe are needed to program in assembly from the command line, and no set-up of Zmac is required.
IV. Download PS Pad and Z80.ini
Here are the steps required to set up PSPad and Zmac for use with the Z80 CPU:
-
Download PS Pad from the PS Pad website. The latest version can be found there. If the website isn't working at the moment, or the newest version of PS Pad has changed substantially from the version I'm using to create these instructions, then you may want to use the local download file.
www.pspad.com (the PS Pad website; get latest version here)
pspad456en.zip (PS Pad 4.5.6, Local Version)
- PS Pad does not have to be installed. All of the files required to run the program are contained in the archive. Once the archive is unzipped, the program will run simply by executing PSPad.exe. Note that when the PS Pad archive is unzipped, a new directory will not be created. Instead, all files will go into the current directory. I recommend unzipping all of the files into a new directory called "pspad."
- Once we finish with the set-up, a Z80.ini file will allow PS Pad to "understand" that a Z80 extension should be used with the Zmac assembler.
- Download the expanded Z80.ini set-up file, created by Richard Degler for use with the Bally Arcade/Astrocade:
PSPAD_New_Z-80_INI.zip
- Once it's unzipped, place the z80.ini file into the "Syntax" directory within the "pspad" directory. A Z80.ini file probably already exists in the "Syntax" directory. It is necessary to replace it.
The PS Pad editor can now be started, but it will not yet be able to assemble Z80 source code. For that, the editor must be set up for use with an assembler.
V. Download "Home Video-Game Library" Equates (HVGLIB.H)
The Bally Arcade/Astrocade console includes an 8K ROM that contains four programs, plus the subroutines that these programs use. These subroutines reduce the amount of cartridge ROM required by programs that aren't built in. This was done to simplify game programming; the wheel would thus not have to be reinvented for simple tasks, such as clearing the screen.
Since these subroutines were meant to be used by future cartridges, a standard equate file was created. Zmac is perfectly capable of assembling a Z80 source file, but without the HVGLIB equate file created for programming the Bally Arcade/Astrocade, the source code that uses these Bally subroutines will not assemble properly. Therefore, for most Astrocade programming, this header file is absolutely required.
- Download HVGLIB.H:
HVGLIB.H - "Home Video-Game Library" Equates
The HVGLIB cannot be used without an understanding of how to use the Bally's on-board ROM subroutine system. Luckily, the "Handbook of Hardware & Software" (written for the original Bally Arcade programmers) is available to modern programmers who wish to use the library of subroutines built into the Bally system.
VI. Set Up PS Pad for Use with the Zmac Assembler
This is how to set up PS Pad to automatically assemble Z80 source code:
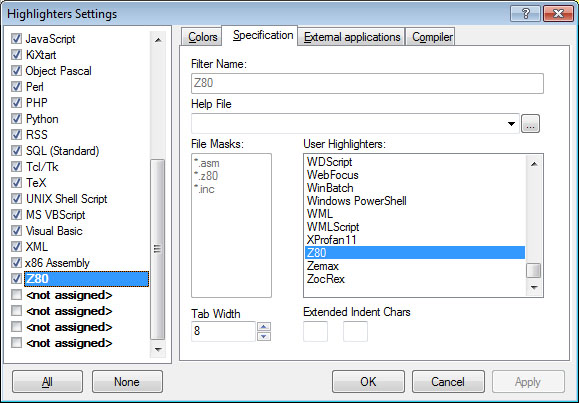
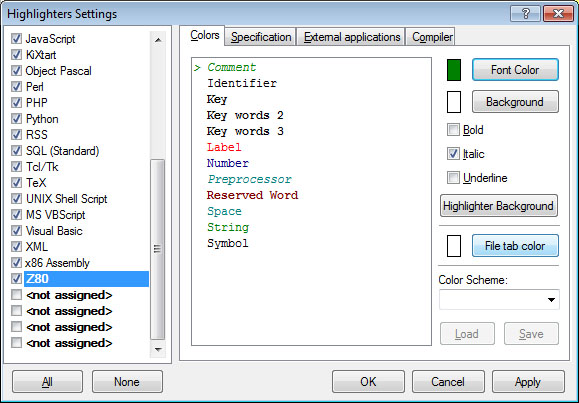
- Click Settings > Highlighter Settings. Choose the tab called "Specification."
- Scroll down the list on the left-hand side and highlight "<not assigned>". Choose "Z80" from under "User Highlighters:". Click the "Apply" box.
- The default color for comments is blue. This is non-traditional, and I prefer the more standard green.
 PS Pad's "Colors" tab
 - Click the "Colors" tab.
- Choose a shade of green that looks good to you. I prefer the basic green that is fourth from the top and third from the left. Its color values are: Red: 0, Green: 128 and Blue: 0. Click "Apply."
- Click the "Compiler" tab.
- Make sure the box next to "Capture
Program Output Window" is checked.
 PS Pad's "Compiler" tab
 - Several fields that deal with how to execute the compiler (or, in this case, the Zmac assembler) need to be filled in. If any one of the fields is not correct, the assembly of your program may not work as expected, or possibly not work at all. You must fill the fields with the required directories as they are located on your own computer. Do not copy and paste what I use in my field examples, unless you have decided to use the path "H:\zmac" (as I have done).
- Compiler - This is the path to the location of the Zmac assembler. Place the path to Zmac here.
H:\Zmac\zmac.exe
- Parameters - These are the options that would normally follow the command-line instruction to execute Zmac. These options must be typed exactly as shown, or else Zmac will not assemble the file correctly. The options for Zmac are:
-i -m -o %Name%.bin -x %Name%.lst %Name%.z80
- Default Directory - This is the location of your Z80 source code. Type the path to your programming directory (where your Z80 assembly source file is located).
If you try to use a directory on the C: drive, you may run into problems related to Windows privileges. To avoid this potential issue, just use another drive. (As stated, I use my H: drive.) For this simple example, I've chosen to create a directory called "Source" in the "zmac" directory.
H:\zmac\Source
- LOG File - I don't use a log file, so I don't fill in this field.
- Run After Compilation - I don't use this field, but it allows the final, assembled binary file to be run in an external program (for instance, the Astrocade emulator included in MAME or MESS).
- Output Window - Make sure that "Capture Program Output Windows" is checked. The assembly output will be captured in a "Log" window after a program is assembled. Do not confuse the "Log" window with the above-mentioned log file; they are not the same.
- Compiler - This is the path to the location of the Zmac assembler. Place the path to Zmac here.
- The set-up of the fields is complete. Click "OK."
- Quit PS Pad and then restart it.

VII. Test PS Pad by Assembling Z80 Source Code
Now that you have finished setting up PS Pad to automatically assemble a Z80 source file, it is time to test it. The following steps will guide you through ensuring that a Z80 source file will assemble correctly.
-
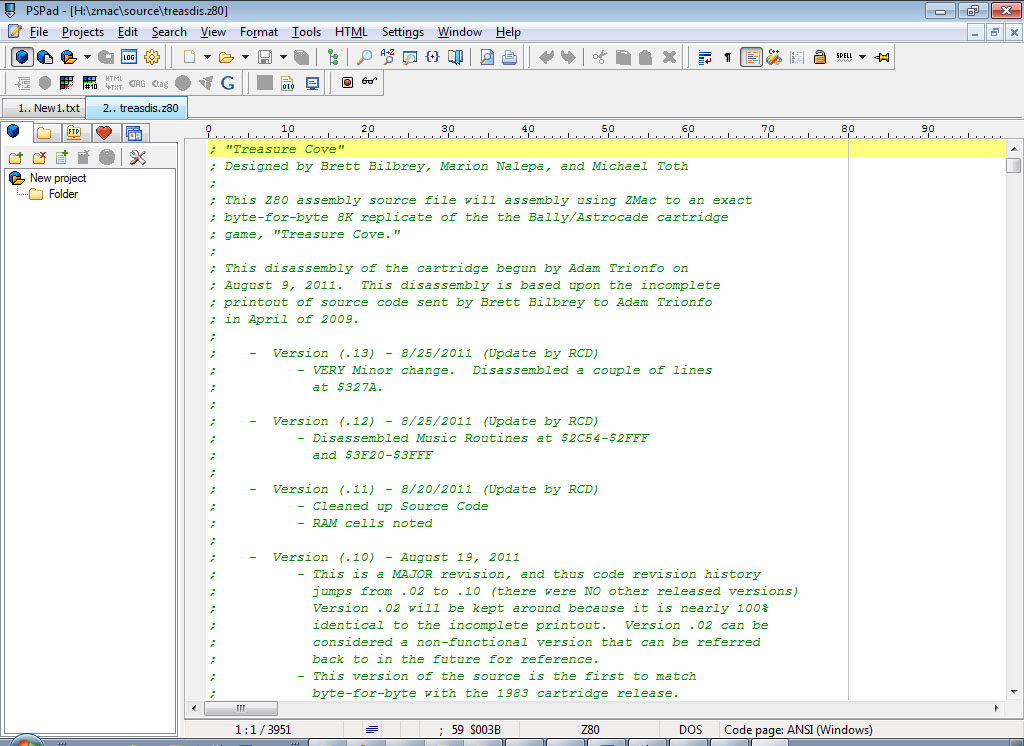
Download example Z80 source code. The source code must be saved in the previously set-up "Default Directory" (under the "Compiler" tab), which I've named "H:\zmac\Source." Spectrecade's Bally Arcade/Astrocade cartridge game, Treasure Cove, comprises source code that is freely available; we'll use it to make sure that the Zmac assembler has been set up correctly. The source code can be downloaded here:
treasdis.z80
- Load "treasdis.z80" into PS Pad using File > Open.
- Assemble the Z80 source file. There are three ways to assemble a source file, and all three will accomplish the same thing:
- Choose File > Compile.
- Click the "Run external compiler to compile file" icon from the control toolbar. The icon has 1s and 0s on it.
- Run external compiler to compile file (CTRL + F9).
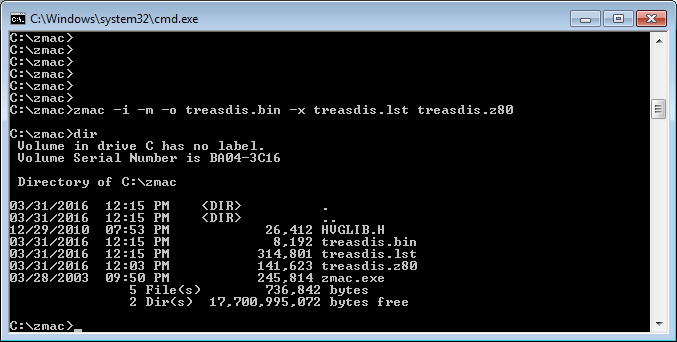
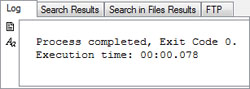 PS Pad's "Log" window"
 - If all has gone well, the "Log" output should read something like this:
Process completed, Exit Code 0.
Execution time: 00:00.078
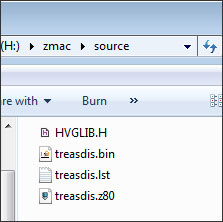 PS Pad has created two files
- After execution, two files will be created in the "Default Directory": treasdis.bin and treasdis.lst.
- Without closing treasdis.z80, return to File > Open within PS Pad and open treasdis.lst. Now you have two tabs available to you: the source file and the assembly listing. Whenever you reassemble the source file, a message box will appear that reads, "File Contents were Changed. Reload? treasdis.lst." Click "Yes."
VIII. Summary
PS Pad is a fantastic editor. Now that you have it set up to assemble your Z80 programs with Zmac, you will see that these combined programs are true time-savers. PS Pad allows for quickly switching back and forth between source code and assembly listings, as well as plenty of customization for all of your needs. Once you begin to use it, you will wonder how you ever got along without it.
IX. Version History
- 1.0 - April 12, 2016
- Article has been edited and checked. Thanks, Chris!
- .10 - March 31, 2016
- Finished updating article for use with Zmac and Astrocade.
- .01 - November 20, 2012
- Reworked article called "The PS Pad editor and DASM Assembler: Assembling Fairchild F8 CPU Source Code" into a preliminary version for use with the Zmac assembler and the Bally Arcade/Astrocade.